
Trimming the Right Way: Tips for Cleaning Wood Floors
Recently acquired hardwood floors? Trying to improve your cleaning skills? Simply curious as to how you can properly clean hardwood floors? Cleaning and maintaining real-wood floors can feel daunting at first, especially if you have no where to start. No one wants to refinish their floors sooner than expected or replace boards that are supposed to have a lot of life left inside of them. That can be pricey and labor intensive—whether or not you have the skillsets to refurnish in the first place.
As such, we want to be completely transparent with our clients and with other homeowners, tenants, or individuals that have a wood floor they need to clean. We want to ensure all homeowners know what to expect and how to keep their floors looking as if they were installed yesterday—in reality, years after the actual completion date. After spending 25+ years working with various wood (and other flooring!) types and having seen our fair share of what works well and what could be done better, we have created a guide that can help anyone needing to clean their hardwood floors get started to prevent nasty headaches down the line caused by mistreatment. First, we will go over how to actually clean the floor, then we will dive into common misconceptions and mistakes we often see with clients post-installation.
Sweeping, Dusting, & Dry Care
Before diving into any soap, water, or any form of “wet-cleaning”, let’s focus on “dry-cleaning” first, which should always be anyone’s first steps every time they do any time of maintenance. If you only have a short time to clean or focus on your floors, this section is what you should be focusing on, not anything else that follows. Skipping this section to do anything that follows may result in scratches, dents, or another deformities in your floors, which can result in bigger issues with the floor itself in the future if whatever is causing the damage is a consistent problem. The finish could be stripped sooner, the wood itself will be more vulnerable, access to the subfloor can become more likely, and more. Even if that type of damage never develops, the aesthetic of having deformities in the floor may be disruptive to the space or potentially later on, the resell value of the property.
On a regular basis, the floors should be swept of any small debris, such as dust and crumbs—typical debris that comes about when living in a space. Anything that is bigger, like a small rock that came off someone’s shoe, should be picked up as soon as you notice the debris there. When sweeping those type of objects or if those objects do move around by other means, they also pose the risk of scratching up the floor. Easy-to-sweep areas, like walkways and underneath a dining room table, should be cleaned more frequently than harder to reach areas, like under a couch or an entertainment center. If anyone that occupies the space has allergies, air sensitives, or a lowered immune system, sweeping under heavier furniture or harder-to-reach areas may need to be done more frequently, but that is entirely up to those who occupy and clean the space. When that type of furniture is moved, make sure they are moved in a safe manner to ensure no injuries to the individuals themselves; furthermore, the bottom of the furniture should not be pushed, dragged, or ultimately moved while touching the ground because that also poses the risk of scratching the floor. More on that later.
That’s the basics of “dry-cleaning”, nothing too complicated. However, the tool(s) you use to sweep also need addressed. If you are using a broom, use a soft-bristle broom, nothing abrasive. The same idea goes with a vacuum; a vacuum should also have softer-bristles if it is going to be used on wood floors. Furthermore, vacuums, if possible, should not be used on the highest setting where all of the bristles are rotating or going at full speed. Using anything that isn’t soft-bristled or motorized at full-speed capacity meant for carpets and other textiles will scratch the floor. They may be small, micro-scratches that are difficult to see at first, especially depending on the lighting and finish of the floor, but they are there and can grow. Be gentle when sweeping, use a gentle tool, and you are all-set!
Mopping, Wax, & Wet Care
Now to move onto “wet-cleaning”! This is where you can pull out the bucket of water and a mop. Before you do, be careful and aware of the techniques you are using to clean the floor. At this stage in the cleaning process, there are multiple points where errors can be made and cause massive damage over time if consistently cleaned using the same methods. The process itself is not difficult, but there are many opportunities where you may go wrong.
Selecting the Right Products
First and foremost, picking out the right floor cleaner can be difficult. There are so many options on the market, so many home remedies, and so many combinations to pick from that it is hard to choose. When selecting what to use, keep a couple of things in mind:
1- Select something that is pH neutral, or in other words, has a pH of 7. Anything higher, like bleach, will discolor, warp, and weaken the wood itself. The floors will deteriorate faster and later on, may not be possible to be properly refinished because the wood itself is weaker and more susceptible to damage. With a higher pH and a more basic formula, think what bleach does to someone’s hair—a similar concept is going on with the floor itself. As for anything with a lower pH, like vinegar and other acids, the finish will be stripped from the wood, exposing the wood to more elements that can cause more damage. Water becomes easier to seep into the wood, which then can rot the wood, reach the subfloor, and damage underneath the floor—all of which can be a massive financial and labor bill, depending on how extensive the problem is. As such, pick something right in the middle of the pH scale: 7. For example, water is usually around 7 ±0.5, so if you heat the water up, but not to a boiling point where heat damage could happen, water can be a good sanitizer for the floor. Think around hot chocolate, coffee, or tea temperature in terms of how warm the water should be. Other solutions and our recommendations are mentioned below.
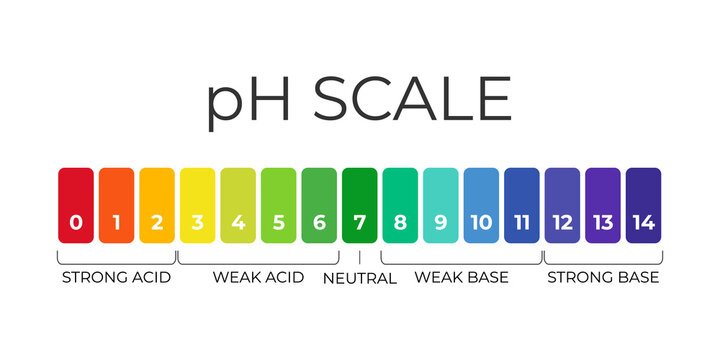
Aim for a pH of 7—not too acidic, not too basic
2- Ensure the product itself is a CLEANER, not a POLISHER. Products are usually labeled either as a cleaner, polisher, or a wax. At this stage, make sure the product is a CLEANER. If you use anything else, the floor is not being cleaned. Polish or wax should not be applied at this stage, as the floor itself has not been prepped for that type of product to be applied. More often than not, we see clients use polishers to mop their floors, which ends up causing the dirt and grim to stay on top of the wood and not result in the shine you are expecting.
As you may have caught, common cleaning agents found in homes may not be suitable for cleaning your hardwood floors. Bleach, vinegar, Pledge, and Dawn Dish Soap should NOT and SHOULD NEVER be used to clean your floors. Any home remedies that use those type of products will not work and will end up causing damage to the integrity of the wood. Chemicals should never be mixed without knowledge of how they may react together, but if any of those type of common household cleaning agents are in the mixture, do not use on your hardwood floors. If you are unsure of the pH of a certain cleaning agent, the product may have it listed on its packaging or the manufacturer or brand may have it posted on their website. If you still can’t tell what the pH is after looking online or are getting multiple answers from various sources, call that product unsafe until you are able to confirm the pH. After you know, then take a look into the cleaning factors and chemicals in it before deciding. This is where knowing what finish is used on the floor and, ideally, where manufacture’s information would heavily come into play. Other chemicals, though their pH may be fine, may still cause issues. A majority of floors are finished with polyurethane components, which may react poorly with various cleaning agents, such as silicon, lacquer, plastics, and other similar materials or chemicals. The reaction may not be visible initially, but when it comes time to refinish the floors, the floor may no longer polyurethane or other types of finishes as effectively. Furthermore, the floors may look and feel more dull if the wrong product is selected, and they may no longer be as durable because the finish has been damaged.
Now that we have gone over what to look for in a cleaning agent, let’s go into the types of mops. Most mops work fine, for as long as they are microfiber and non-abrasive. The material should be soft and gentle, nothing brittle, hard, or stiff. Cloths work wonderful as well, if and only if they are microfiber cloths. Much like the broom or vacuum, if the mop or cloth is more coarse, the floor risks being scratched and damaged.
Mopping Techniques

As for mopping techniques, there are multiple options to choose from. If you are using the traditional bucket and a mop, you will likely want two buckets to make the process easier and cleaner. Be sure the mop is not soaking in water. When you pull it out of the bucket, you will most likely need to ring it out or squish water out of the fibers. You’ll know when you are good to use the mop when it is no longer dripping with water. Move the mop against the direction of the floor. For example, if your living room has a couch going with the direction of the planks, then mop in the direction up and down—perpendicular to the direction of the planks (See the diagram on the right for an illustration.).
Ultimately, remember to go perpendicular to the boards, not with them—regardless of what you use to mop.
Moving the mop in a figure 8 pattern also helps. Mopping will be more efficient this way in terms of pulling up dirt—instead of simply moving it around the room as you mop—and distributing the right amount of product to the entire floor. If possible, try mopping your way out of the room, as doing so will prevent streaks. Remember to clean out the mop as you clean to remove dirt that is building up, then reapply solution and wring out water as needed.
We recommend using another method compared to the traditional bucket and a mop method: the spray and wipe. If you spray down the solution, you have more control over how much water you are introducing to the wood floors. Furthermore, stubborn areas are easier to manage and resolve using this method. Ultimately, the concept is the same, except you use a spray bottle to put down the solution, then the mop or rag to wipe it. Figure 8 technique of moving the mop is the same in this method as well.
As for electronic mops, make sure the bristles are gentle, and the machine does not drop out too much water. If too much water comes out at once, don’t panic. You can move the mop around to distribute the water more evenly across the entire floor. If there is still too much water, absorb as much as you can off the floor using a microfiber rag. Sometimes some devices need getting used to before knowing how to fully use and properly apply the right amount of product and when.
Regardless of what method you end up using, remember to clean the tool(s) to prevent the dirt and grim from spreading upon next use or mold growth from improper cleaning and drying. The floors should dry within a couple of minutes, and depending on the room, a part of the space may already be dried. Hardwood floors should not take more than 15-30 minutes to dry, and in reality should be good to go within 5 minutes or less. If there is too much water, use a microfiber cloth to blot up large sections of water and potentially use a fan to help dry the area. However, using such methods should not be a common occurrence. The fan and the cloth itself won’t damage the floor, but over wetting the area consistently will.
What about Waxing and Polish?
Waxing does depending on the type of finish on the floors, but for a vast majority of hardwood floors, do not wax them. We dived a little bit into polyurethane in the product selection portion of the post, and waxing actually reacts negatively with polyurethane. Most finishes contain polyurethane, which helps prevent scratches, dents, and other deformities from developing, and when wax is applied to woods with such finish, the finish itself warps and will not have the shine you expect when cleaning. Furthermore, when it comes time to refinishing the floors, the finish will be stubborn to reapply, as the wood has undergone changes due to the reaction between polyurethane and wax—regardless of what type of wax was used, liquid or solid. Other types of flooring, such as natural bamboo or LVP, are also treated during the manufacturing and installation process, where wax is no longer necessary for the maintenance of the floor. As such, waxing bamboo, LVP, laminate, or other vinyl products will result in a film appearing on top of the floor, causing yellowing, dirt to become trapped, and overall a dull and dirt feeling to the floor. Essentially, wax for most floors is not recommended and is not worth applying in both the short and long run.
The same idea goes to polish—do not polish your hardwood floors. Usually, the wrong type of polish is used, which ultimately ends up damaging the floor in similar ways wax can. Polish can make the floor have a nice shine, but if done improperly or the wrong product is used, that shine will not be the same shine you are expecting and will end up dulling the floors later on. However, if you have access to the instructions from the manufacturer for the specific type of flooring you have, the manufacturer may have information on the correct polish type and methods that will work wonderfully with your floor. In that case, polish according to the manufacturer. Any other method may damage the floor and result in a voided warranty or more issues in the future. If you aren’t sure or don’t have access to the manufacturer’s information, stay clear from polish; normal cleaners have the potential to make a similar shine appear without polish.
Moving Furniture
How do you move furniture when you need to sweep and mop underneath them? Much like choosing the right cloth to wipe up spills or the right bristle for the inside of the vacuum, you do not want to slide or move the furniture in a way that will damage the floor. As difficult as it may seem trying to move around heavy items to ensure everything is cleaned properly, there are a couple of methods that can help you move large pieces of furniture with ease.
All furniture should have felt or other forms of protection on the side that touches the floor directly to prevent damage during normal use. However, even with the felt pads on the bottom of the furniture, you should not push, pull, or drag the furniture across the floor; the felt is there for normal wear-and-tear protection, not for full-force movements. A dining room chair is pulled out from a table and put back, for instance. The felt is meant to protect the floor and furniture in those type of instances, not in major movements and cleanings. With that out of the way, let’s look at the different methods of moving bigger pieces of furniture on hardwood floors.
1- Take your time moving it. Going slow allows you to make any adjustments at any time before causing serious damage to yourself, others, the floor, or other objects.
2- Lighten the load. Make the moving process easier on yourself by making the load lighter, if possible. For instance, remove all pillows, blankets, and other objects off of a couch before moving to make it a little easier on yourself.
3- If you are sliding the object, use soft objects on the side against the floor. Folded towels, thick blankets, and small area rugs can be a great tool in this situation. Make sure all surfaces touching the floor having something for them to rest on as the object slides, as that will make it easier on yourself and protect the floor. It’s a win-win! Just remember to clean the soft objects beforehand of any debris or other irritants before placing them on the floor. Debris on the soft object can scratch the floor, which defeats the point of putting them down in the first place.
4- Try using gliders. There are gliders on the market that can fit underneath the legs of different furniture pieces that allow you to slide the furniture, much like the previous point. Gliders are reusable, come in various shapes and sizes, and are affordable. Make sure they are a soft, clean, and non-abrasive surface on the floor-side of the glider to ensure the floor will not be damaged.

An example of a Glider
Each of those methods will make it easier to move the furniture and also protect the floor to allow you to properly access and clean the portions of the floor not always reachable. Keep in mind the materials you are using to move the furniture, as some may damage the floor. Wheels, for instance, should never be used. Hard, heavy dolly wheels may damage the floor—rather, all wheels have the capacity to damage the floor with ease. If wheels have to be used and a clean, debris-free tarp, paper, or blanket cannot be put down for the object to roll on, use inflatable wheels. These wheels have the least chance of causing damage.
Product Recommendations
Going back to products, we do have a couple of cleaners we do recommend. The following links are NOT affiliate links, so if you use those links, we do not make a commission off of them. If you have any questions about any of the links or products, reach out to us or the manufacturer for more information. We are happy to answer any questions you have!
LOBA Floor Cleaner
LOBA is our number one recommendation when it comes to floor cleaner—and mop—options. For most of our installs, we use LOBA stains and finishes, and they have actually designed a cleaner that works in harmony with their finishes. The products interact positively with one another—including non-LOBA finishes—leading to a cleaner feeling and a strengthened protection for the surface. Furthermore, the product is pH neutral and is designed with sustainability and the environment in mind; in other words, the product can be use on ANY hard surface within the home, such as granite countertops. If you do use it on other surfaces, we recommend testing the product on a small area to ensure damage does not occur. We love a safe, multi-use cleaner that is designed with families and the environment in mind!
Visit their website for more information. LOBA is also available on Amazon and at Walmart for purchase.
Bona Floor Cleaner
Bona is another product we recommend. Their products are safe to use with a majority of finishes and goes well with their line of stains. In our experience, Bona is another fabulous cleaner that does a wonderful job at cleaning and protecting the floor from normal wear-and-tear. Because the product is pH neutral, Bona will be safe to use on your floors if you are unsure what the finish is.
Visit their website for more information and products. Bona also has a line of mops and other household cleaners that may work well for your family and space. BONA is also available on Amazon and at Walmart for purchase.
Brief Overview
If you do not need an in-depth guide, no worries! Here is a condensed version of the article for a quick-glance:
1- Sweep frequently. Take care of bigger debris, like pebbles, as soon as you notice them. Use a non-abrasive broom or vacuum.
2- Take care of any spills or other liquids as soon as possible to prevent moisture damage. Use microfiber cloths.
3- Select a product that is pH neutral for your mopping solutions. Do not use chemicals or common household cleaning agents like bleach, vinegar, or dish soap.
4- Be conservative with how much water you use. Do not puddle water when mopping. Use a soft mop, microfiber cloth, or bristle attachment for a mop vacuum.
5- Ensure the floor dries within a couple of minutes upon completion.
6- Do not wax or polish your floors. Doing so will ruin the finish of the floors and the quality of the wood itself.